 |
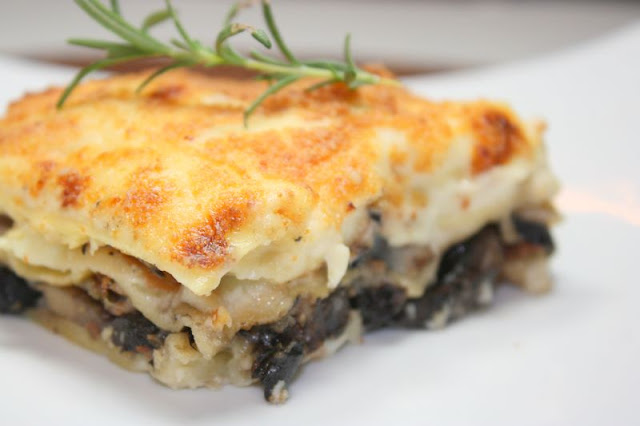
| Roasted Portobello & Prosciutto Lasagna |
In the mood for something meaty, but without all the meat? The Portobello mushrooms in this dish function as the “meaty” component & are a nice change from your typical lasagna. Plus, you'll be getting a good source of Vitamin D for the day, as one medium-sized mushroom = 100% Vitamin D. We all could use a little extra Vitamin D in our diets, don't you think?? Give it a try!
I found this recipe lying in between a big stack of cooking magazines. It was saved as a recipe to try, but I didn’t know it would take me six years to actually make it. Yes folks, I have six-year-old magazines piling up in my garage. And the sad part is that I actually found one dated back to 1989!! You may be thinking to yourself, “hoarder, much?” but I am not that crazy. I only save the good-looking recipes in magazines & recycle the rest. And I’m glad I do, because otherwise I would have never stumbled upon this yummy lasagna recipe.
The lasagna’s rich & cheesy flavor also reminded me of mac ‘n cheese. I would love to try this recipe again…but as a mac ‘n cheese. To do so, substitute Cellentani noodles (my fav!) and dice the mushrooms into smaller pieces. You can also omit the mushrooms altogether and add a few cans of drained, diced tomatoes in its place. Doesn’t that sound good? :) XOXO....little j Y
Roasted Portobello & Prosciutto Lasagna
Adapted from: Bon Appétit Magazine, Oct. 2004
Makes 10-12 servings
3 tbsp olive oil + 2 tsp
2 lbs Portobello mushrooms, stems removed
1 cup prosciutto, chopped
2/3 cup shallots, chopped (you’ll need 2-3 shallots)
1 tsp fresh rosemary, chopped (or dry rosemary)
1 tsp fresh thyme, chopped (or dry thyme)
4 cups milk (I used 1% milk)
1 (14 oz) can chicken broth
1 bay leaf
½ cup (1 stick) unsalted butter
2/3 cup flour
½ Swiss cheese, shredded
½ cup Aged Asiago cheese, shredded
1/3 cup Parmesan cheese + ½ cup to top lasagna before baking
1/8 tsp ground nutmeg (optional)
salt & white pepper, to taste
1 lb lasagna noodles
2 tbsp unsalted butter, cut into ½ inch pieces
*Note: The original recipe used Gruyère (also a great cheese!) in place of the Swiss & Aged Asiago I used. Also, this dish is kind of time consuming. Make the mushrooms & prosciutto-shallot fillings ahead of time (that’s what I did). If you have enough time, make the entire lasagna & refrigerate it overnight. When dinner time rolls around, stick it in the oven to bake!
For the Mushroom Filling:
Preheat oven to 400 degrees F.
Arrange mushrooms on a greased (use 1 tbsp olive oil) baking sheet. Drizzle with 2 tbsp olive oil & use a basting brush to coat both sides of the mushroom. Sprinkle with salt & pepper. Roast in oven for 45 minutes or until tender. Set aside to cool, then slice mushrooms about 1/3-inch-thick. Set aside until ready to assemble lasagna.
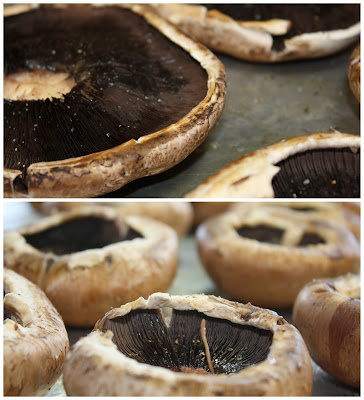 |
| I used a variety of sizes! |
For the Prosciutto-Shallot Filling:
In a medium-sized pan, heat 2 tsp olive oil. Add prosciutto and sauté until brown. Add shallots, rosemary and thyme. Cook an additional 5 minutes or until shallots become tender. Set aside until ready to assemble lasagna.
For the Béchamel Sauce:
In a large saucepan, bring the milk, chicken broth & bay leaf to a simmer over medium heat. Once it begins to simmer, remove saucepan from the heat and let it stand for 10 minutes. Then remove & dispose the bay leaf.
In a medium-sized saucepan, melt butter over low-medium heat. Whisk in the flour and keep stirring for 2 minutes. Then add the hot milk mixture and bring to a boil. Whisk frequently. Don’t leave the stove because it can boil over if you aren’t watching! Once the mixture comes to a boil, reduce the heat to low & let simmer for an additional 5 minutes. Again, whisk frequently. Remove from heat & stir in the cheeses and nutmeg. Season to taste with salt and white pepper.
For Lasagna Noodles:
In this recipe, I used flat noodles that don’t require boiling. However, I prefer the regular lasagna noodles. If using the regular noodles, boil them as directed on the box. Drain, then rinse with cold water & pat dry. Use 1/3 of the total noodles for each layer, as this lasagna will have three layers.
Another suggestion is to buy the regular lasagna noodles & not boil them either. My “Uncle Eddie” makes his lasagna without boiling the noodles first and it always comes out great, so you might want to give it a try if you don’t want to hassle with all that boiling.
Putting it All Together:
Preheat oven to 350 degrees F.
Grease a 13x9x2 pan (or that neat-o Baker’s Edge Lasagna Pan I mentioned in my
Top 10 Gift List). Spread 1 cup Béchamel sauce over bottom of pan. Arrange 1/3 of the noodles over the sauce. Spread 1 2/3 cups Béchamel sauce over noodles. Scatter ½ of the mushrooms & ½ of the prosciutto-shallot filling over the sauce.
Use ½ of the remaining lasagna noodles for the next layer. Then spread another 1 2/3 cups Béchamel sauce over noodles. Scatter remaining mushrooms and prosciutto-shallot filling over sauce. Top with remainder of lasagna noodles. Spread the rest of the Béchamel sauce over the noodles. Sprinkle with 1/2 cup Parmesan cheese & top with butter pieces.
Bake for 45 minutes (or 1 hour if refrigerated). Let stand for 20-25 minutes before serving.